Inspirations
SEWING TUTORIAL:
“Midi Skirt with gathering”

![]() MATERIALS
MATERIALS
- silk taffeta (or other type of volume fabric)
- silk organza (or other type of volume fabric)
- stiff woven fusible interfacing (for the waistband)
- 9 inch (20 cm) concealed zipper (same colour as the fabric)
- 2 metal fasteners
- sewing thread (same colour as the fabric)
- universal needles for machine H 70/10 or H 60/10
- 4 cones for overlock machine (same colour as the fabric)
- basting thread, needle, pins, tape measure, scissors
![]() ACCESSORIES
ACCESSORIES
- elna eXcellence 780+
- elna eXtend overlock
- Concealed zipper foot (Ref.: 202-156-004)
![]() PATTERN
PATTERN
This skirt is very simple to make and does not require a sewing pattern. It only involves three right angle triangles (one for the waistband and two for the skirt). This is a double height skirt and there is no seam at the bottom hem. The silk organza is used as reinforcement between 2 layers of silk taffeta.
The lengths are easy to determine thanks to our “fabric length” calculation guide explained below. Once your lengths are determined, use your tape measure to bring these measurements onto the fabric and cut out the pieces.
![]() FABRIC LENGHT
FABRIC LENGHT
Skirt
Width: (your waist x 3) + 1 1/4″ (3 cm) seam allowance
E.g.: (27 1/2″ x 3) + 1 1/4″= 83 3/4″ / (70 cm x 3) + 3 cm= 213 cm
Height: (desired height x 2) + 1 1/4″ (3 cm) seam allowance
E.g.: (29 1/2″ x 2) + 1 1/4″= 62 1/4″ / (75 cm x 2) + 3 cm= 153 cm
Waistband
The waistband has a underflap for fasteners.
Width: your waist + 1 1/4″ (3 cm) (for the underflap) + 3/4″ (2 cm) seam allowance
E.g.: 27 1/2″ + 1 1/4″ + 3/4″= 29 1/2″ / 70 cm + 3 cm + 2 cm= 75 cm
Height: (desired height x 2) + 1 1/4» (3 cm) seam allowance
E.g.: 2″ x 2 + 1 1/4″= 5 1/4″ / (5 cm x 2) + 3 cm= 13 cm
For the waist band’s interlining, you need a piece of woven fusible interfacing for half the waist band only, without the seam allowances.
![]() INSTRUCTIONS
INSTRUCTIONS
1.
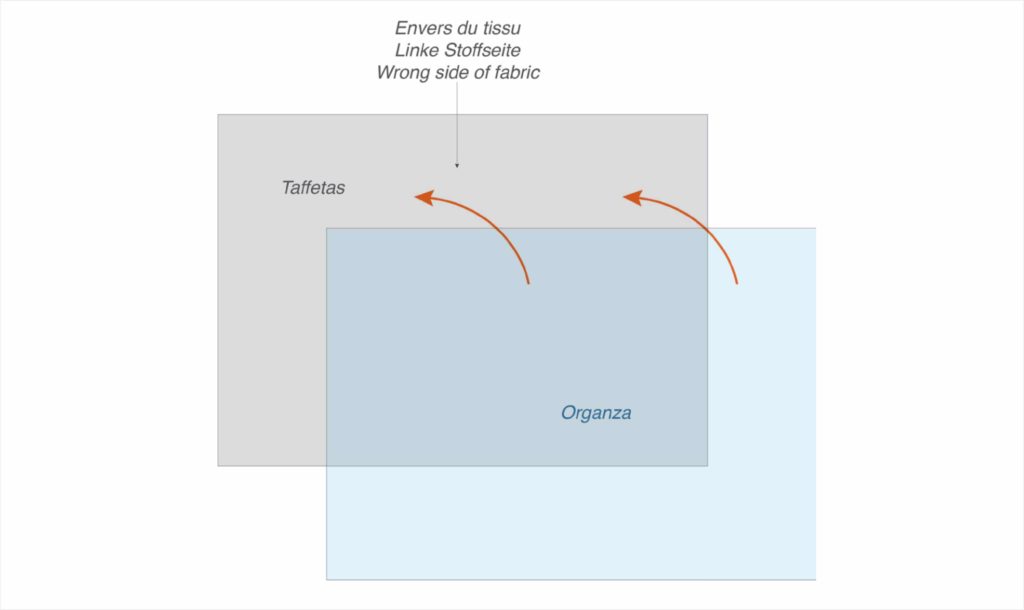
Cut two pieces from the taffeta fabric for the waistband and skirt tail, the interlining from the organza fabric for the skirt tail and the piece for the waist band’s interlining from the woven fusible interfacing. All parts must be cut following the straight grain.
2.
Fold the waistband in half, right sides together, widthwise, and with your iron mark the middle point. Fuse one half-height of the waistband and fold the four edges inwards by 1/4″ (1 cm). Then iron these over. Mark the middle of the waistband and the upright
of the underflap.

3.
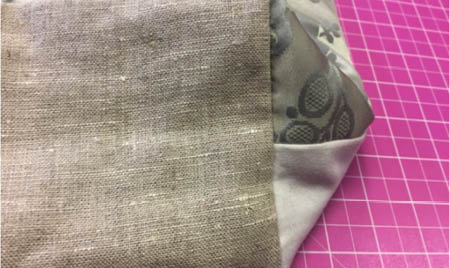
On the wrong side of the silk fabric (right side underneath) place the rectangle of organza. Pin the edges and join the two fabrics together with the overlock machine. Remove the pins and iron the seams.
4.
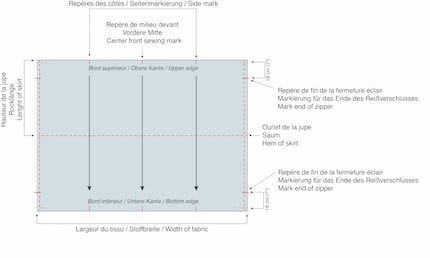
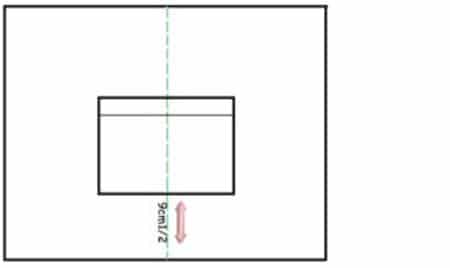
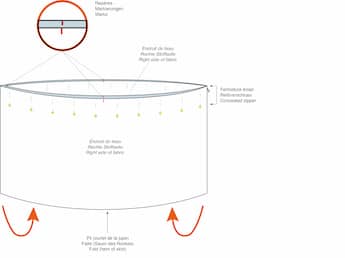
Divide the width of the fabric (without the seam allowance) into 4 parts and with a chalk mark the assembly points (on both sides of the fabric). This will help you divide the gathers later and lay the waistband on the skirt. Then, in the vertical direction mark the middle (which will become the skirt’s hem).
On the side edges (back of the fabric), draw a line 1/2” (1.5 cm) from the edge, from top to bottom. On this line, trace a mark at 1/2” (1.5 cm) from the top and bottom edge to indicate the seam of the belt and a second mark at 7” (18 cm) from the top and bottom edge to indicate the end of the zipper (end of the slit).
5.
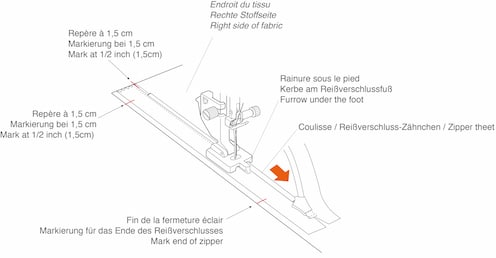
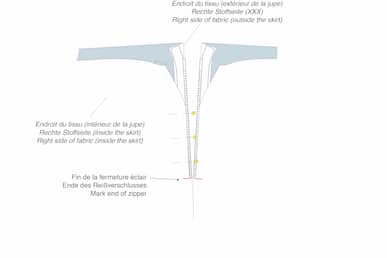
Open the zipper and place the zipper face down on one side of the fabric, and pin them toghether. Attach the “Concealed zipper foot Z” to the machine. Unfold and insert the mesh inside the groove under the foot and sew to the end mark. When finished, fit the second part of the zipper to the other edge of the fabric and proceed in the same manner as for the first part. When finished, close the zipper and gently iron the seams.
6.
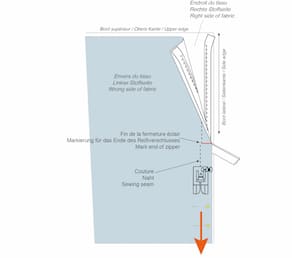
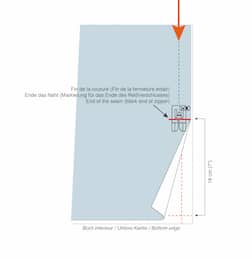
Align and pin the edges of the fabric with the right sides together. Attach the standard foot A to the machine and prick the needle as close as possible to the last stitch of the zipper seam. Sew in a straight line to the mark (end of zipper marking, which is 7.6” (19.5 cm) from the bottom edge) to leave an opening. After that, the opening will position itself at the back of the zipper. When finished, iron the open seam.
7.
Fold the lower edge of the fabric vertically by matching the marks with the top edge. Pin the two edges (upper and lower) together as well as the slit opening on the back of the zipper.
8.
Gathering: To make the fabric easier to gather, adjust the straight stitch length on the machine to its maximum length. For more even gatherings, sew two rows of gathering; the first row at 3 1/4″ (8 mm) and the second at 5.11″ (13 mm) from the top edge and over the entire width of the fabric. Sew the two gathering seams without the safety stitches and once sewing is finished, pull the thread to gain four inches of extra thread.
.
9.
Pin, right sides together, the middle of the skirt in the middle of the waistband (interlined part). On one of the two sides, tie a knot to the two gather threads and on the other side start to gently pull on the fabric to form the gathers. Shorten the width of the skirt’s tail to the desired extent and spread the gathers evenly across the entire width. Lock the gather threads by making a knot.
.
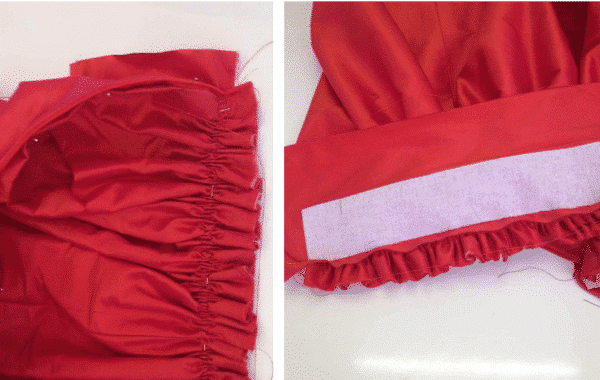
10.
Pin the remaining fabric width to the waistband. Set the stitch width of the machine to the standard width. Gently sew 1/2″ (1.5 cm) from the edge with the gathers on top, to control their distribution and adjust them if necessary. When finished, remove the gather threads and gently iron the seam.
.

11.
Fold the other side of the waistband inside (the fold of the lower edge should be on the seam of the waistband assembly of the skirt) and pin. With a slip-stitch sew the edge of the slit to the zip by hand and the waistband to the skirt including the underflap. Once finished, gently iron your seams.
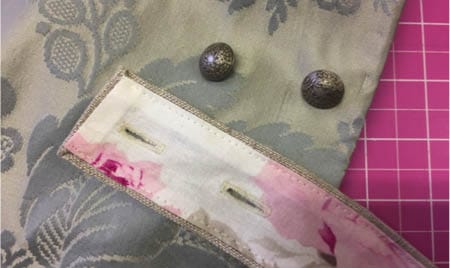
12.
Close the zipper and sew the two concealed fasteners over the zipper, being careful not to prick the outside of the waistband.
Congratulations ! You are done.
If you want to complete your midi skirt with the sumptuous muslin top, you will find the raglan blouse tutorial in the Inspiration section of our website.
© Elna International Corp. SA, all rights reserved
Copyright
The authorization to use this documentation is hereby granted exclusively for non-commercial use. The contents of this documentation are the sole property of Elna International Corp. SA. This documentation shall not in any way constitute a right to transfer any rights with respect to copyrights of Elna International Corp. SA to the user or to third parties.